Approach: Phase 1
This phase is a case of controlling the position and mechanics of the boss to set up safe spaces for the raid. The positioning requirements are very precise and some are raid wiping.
To optimise DPS, the raid will need to be rotated. Familiarise yourself with the following layout ideas:
- Divide the room into two, the near side (close to the raid entrance) and far side
- Start at the far side of the room, initially using the far left pillar
- After the first phase 2, completely switch sides to the near right pillar
The raid layout is designed to mitigate visibility requirements for echoing-screech and is as follows:
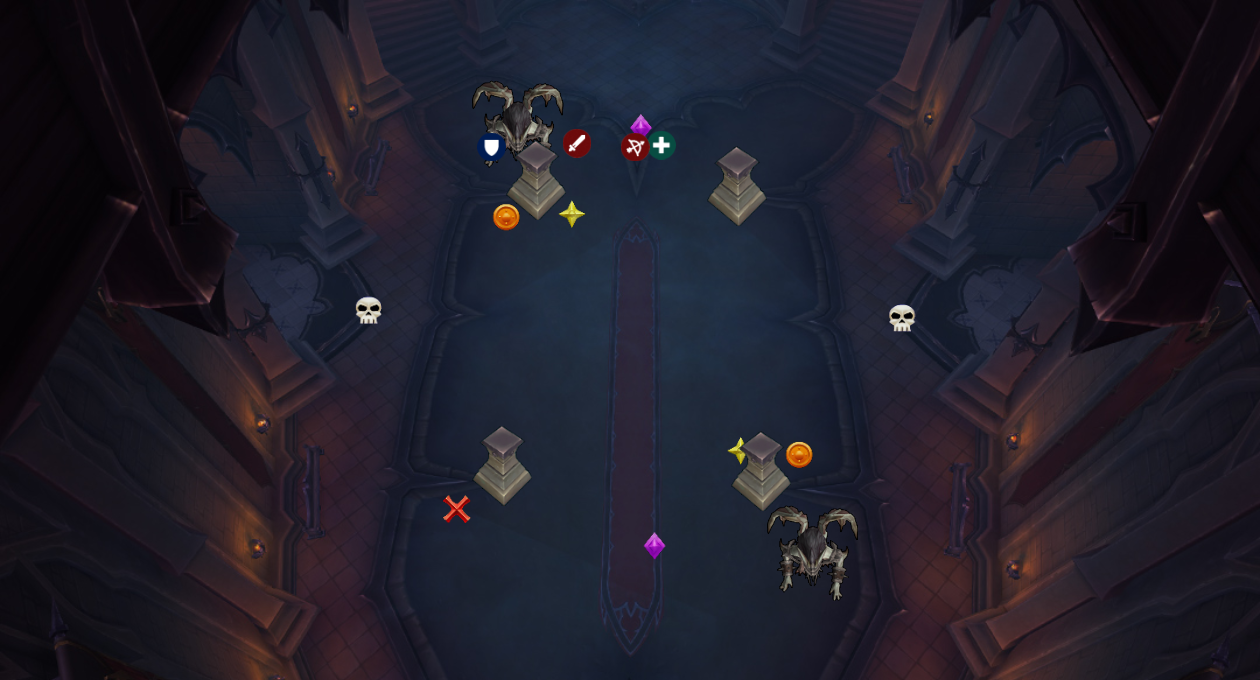
- Position Shriekwing to be close to the far left pillar. This needs to be accurate. Purple and orange both should have a line of sight to shriekwing. Yellow must be out of line of sight. Orange must be within melee range.
- Tanks should face Shriekwing toward the wall, with the remaining players all stacked in a line up to purple. A precise alignment is required in order to bait mechanics.
- blind swipe can be avoided by sidestepping the mechanic; it does not track players. Be sure to reset position afterwards as the bait happens shortly after this cast.
- To mitigate
echolocation
run to a safe part of the floor and proc
descent
dropping the
sanguine ichor
there. There are two safe locations as follows:
- For most of the phase, this should be place at the wall closest to the boss: for example, near the stairs
- During echoing-screech this should be behind the left hand skull
Precise movement allows the visibility mechanics of echoing-screech to be ignored. These movements are as follows:
- If the raid is correctly aligned between Shriekwing and purple, then he will cast echoing-screech into the raid. This is a 3 second cast, after which the boss channels echoing sonar.
- This echoing sonar will be invisible, but its location is fairly predicable if the boss is aligned correctly
- Use a speed boost, such as stampeding roar to quickly move the DPS and healers to orange, where they continue attacking the boss. Please note that this location is extremely sensitive and you should stack at a maximum melee range.
- As mentioned above, place the sanguine ichor from echolocation behind the skull
- The sonar will despawn just as earsplitting shriek is cast
- Once the earsplitting shriek cast has begun, the ranged should break line of sight at the orange marker pillar. The raid should quickly reset position to purple afterwards.
There will likely be three rotations of phase 1. As per the diagram, the raid can swap between the top left pillar and the bottom right pillar. A combination of the movement of the boss in phase 2 and unintended sanguine ichor can cause this. Please be aware of the raid leader's call on where to stand.
Note that during the transition from Phase 1 to Phase 2 the boss still takes damage. Ranged players can continue to damage the boss, but it is vital that melee players do not.
Tanks should
- Mitigate exsanguinating bite with a cooldown, and it should be immediately followed by a tankswap or a Kyrian special ability
Healers should:
- Rotate a cooldown for the wave of blood to ensure that players are topped off before the movement to the pillar
Key mechanics to master:
- Precise movement to the correct markers (purple -> spread -> purple -> orange -> yellow)
- Run out of the group if echolocation is cast on you, returning quickly after it is complete